Intro
For the full primer please read Here. This is a document outlining my modifications to the parent doc directly from ZFSbootmenu for installing a Debian Bookworm on ZFS root partition found Here
The modifications I have made are choosing to boot first from a USB drive, and setting up some symlink magic to lay the groundwork for eventually using the USB to also decrypt the root partition. Once I have that working I will update this document.
So with out further ado
What Works?
- Pretty much everything.
What Doesnt?
- auto-unlock with external keyfile. I’m actively working on this.
Hardware
I’m using a Razer Blade 2023, yes I know I agree. But I’m an aesthetics and composition girly and their hardware for their laptops is CLEAN. So that said: moving on.
Software
- Windows 11
- Debian Bookworm Live
- ZFSbootmenu
- AND assuming you do not have access to a CLI to
ddan image, RUFUS
My modified method derived from the aforementioned ZFSbootmenu doc are as follows.
Before Starting
Windows
Boot into Windows, launch disk management and defrag your C:\ . Then attempt to decrease its size as much as possible. Note it’s size to identify it later. Take a backup if you’re wise, or don’t if you live on the edge.
Create your Debian Live CD, and in case you bork something, your Windows 11 Media
Bios
Disable secure boot in the bios. I know. I’m Sorry.
Configure Live Environment
Switch to a root shell
sudo -iConfirm EFI support:
# **dmesg | grep -i efivars**
[    0.301784] Registered efivars operations
Export ID
source /etc/os-release
export ID
This will be used to name a dataset later on your root zpool.
Configure and update APT
cat <<EOF > /etc/apt/sources.list
deb http://deb.debian.org/debian bookworm main contrib
deb-src http://deb.debian.org/debian bookworm main contrib
EOF
apt update
Install Helpers
apt install debootstrap gdisk dkms linux-headers-$(uname -r)
apt install zfsutils-linux
Generate Host ID
zgenhostid -f 0x00bab10cDisk Preparation
Install gparted
apt install gpartedSeparate Boot Drive
Define Boot Drive Variables
We want to do this so we don’t make mistakes. Here we’re combining 2 parts of the docs, that they assume are not used at the same time.
note: I will not include real names here so you cannot accidentally bork your system by copy pasting something not tailored to your system.
export BOOT_DISK="/dev/<YOUR DISK HERE>"
export BOOT_PART="<YOUR PARTITION HERE>"
export BOOT_DEVICE="${BOOT_DISK}${BOOT_PART}"
Format Disk
wipefs -a "$BOOT_DISK"
sgdisk --zap-all "$BOOT_DISK"
sgdisk -n "${BOOT_PART}:1m:+512m" -t "${BOOT_PART}:ef00" "$BOOT_DISK"
sgdisk -n "${BOOT_PART}:1m:+512m" -t "${BOOT_PART}:ef00" "$BOOT_DISK"
KeyDrive
We would also like the decryption keyfile to be placedon the removable drive for security reasons.
Use gparted to create a partition of type ‘unformatted’ on the boot key.
note its partition number and run the following
zpool create -f -o ashift=12 \
    -O compression=lz4 \
    -O acltype=posixacl \
    -O xattr=sa \
    -O relatime=on \
    -O encryption=aes-256-gcm \
    -o autotrim=on \
    -o compatibility=openzfs-2.1-linux \
    -m none zdrive <YOUR KEY PARTITON HERE>
Now tell it to mount where we want our key to be located.
zfs set mountpoint=/etc/zfs zdriveRoot Partition on NVME drive
Take note of which partition your C:\ holds.
#lsblk
NAME        MAJ:MIN RM   SIZE RO TYPE MOUNTPOINTS
sda           8:0    1  57.8G  0 disk
├─sda1        8:1    1   512M  0 part /boot/efi
├─sda2        8:2    1  31.4G  0 part
└─sda3        8:3    1  25.9G  0 part
nvme0n1     259:0    0   1.9T  0 disk
├─nvme0n1p1 259:1    0 512.2G  0 part
├─nvme0n1p2 259:2    0   100M  0 part
├─nvme0n1p3 259:3    0    16M  0 part
├─nvme0n1p4 259:4    0   1.3T  0 part
└─nvme0n1p5 259:5    0  1000M  0 part
for me it’s /dev/nvme0n1p4. Do Not Touch It.
I cheat here. To ensure my placement is correct with the dual boot I opt not to use CLI here and instead use gparted. you will want to (again) try downsizing your C:\ partition if you weren’t able to create enough space before. and create a new partition where you need it of type ‘unformatted’
somehow this became /dev/nvme0n1p1 for me
Define Variables
export POOL_DISK="/dev/<YOUR DISK HERE>"
export POOL_PART="<YOUR PARTITION HERE>"
export POOL_DEVICE="${POOL_DISK}p${POOL_PART}"
Create zpool
We wanna use ZFS’s native encryption (because it’s neat) so do as follows to create a key
echo 'SomeKeyphrase' > /etc/zfs/zroot.key
chmod 000 /etc/zfs/zroot.key
then create the pool
zpool create -f -o ashift=12 \
    -O compression=lz4 \
    -O acltype=posixacl \
    -O xattr=sa \
    -O relatime=on \
    -O encryption=aes-256-gcm \
    -O keylocation=file:///etc/zfs/zroot.key \
    -O keyformat=passphrase \
    -o autotrim=on \
    -o compatibility=openzfs-2.1-linux \
    -m none zroot "$POOL_DEVICE"
Create initial file systems
zfs create -o mountpoint=none zroot/ROOT
zfs create -o mountpoint=/ -o canmount=noauto zroot/ROOT/${ID}
zfs create -o mountpoint=/home zroot/home

zpool set bootfs=zroot/ROOT/${ID} zroot
Export, then re-import with a temporary mountpoint of /mnt
zpool export zroot
zpool import -N -R /mnt zroot
zfs load-key -L prompt zroot
zfs mount zroot/ROOT/${ID}
zfs mount zroot/homeVerify that everything is mounted correctly
mount | grep mnt
zroot/ROOT/debian on /mnt type zfs (rw,relatime,xattr,posixacl)
zroot/home on /mnt/home type zfs (rw,relatime,xattr,posixacl)
Update device symlinks
udevadm triggerInstall Debian!
debootstrap bookworm /mntwhen finished I did the following. https://simpleit.rocks/linux/replicate-installed-package-selections-from-one-ubuntu-system-to-another/ This will ensure I can populate our minimal install with many of the things we’ll need.
apt-mark showauto > pkgs_auto.lst
apt-mark showmanual > pkgs_manual.lst
Copy files into the new install
cp /etc/hostid /mnt/etc/hostid
cp /etc/resolv.conf /mnt/etc/
cp pkgs_auto.lst /mnt/root
cp pkgs_manual.lst /mnt/root
mkdir /mnt/etc/zfs
Chroot into the new Install!
mount -t proc proc /mnt/proc
mount -t sysfs sys /mnt/sys
mount -B /dev /mnt/dev
mount -t devpts pts /mnt/dev/pts
chroot /mnt /bin/bash
Basic Debian Configuration
Set Hostname
echo 'VCR' > /etc/hostname
echo -e '127.0.1.1\VCR' >> /etc/hosts
Set a root password
passwdConfigure APT
The documentation uses the following
cat <<EOF > /etc/apt/sources.list
deb http://deb.debian.org/debian bookworm main contrib
deb-src http://deb.debian.org/debian bookworm main contrib

deb http://deb.debian.org/debian-security bookworm-security main contrib
deb-src http://deb.debian.org/debian-security/ bookworm-security main contrib

deb http://deb.debian.org/debian bookworm-updates main contrib
deb-src http://deb.debian.org/debian bookworm-updates main contrib

deb http://deb.debian.org/debian bookworm-backports main contrib
deb-src http://deb.debian.org/debian bookworm-backports main contrib
EOF
however I add non-free non-free-firmware to every line because my laptop requires me to have these or i will be missing things.
Additionally the page here https://www.debian.org/releases/bookworm/ says “Contrary to our wishes, there may be some problems that exist in the release, even though it is declared stable. We’ve made a list of the major known problems,”
Following that link, I add the following to my sources.list as well
deb http://security.debian.org/ bookworm-security main contrib non-free non-free-firmwarenow run
apt updateInstall additional base packages
apt install locales keyboard-configuration console-setupConfigure packages to customize local and console properties
dpkg-reconfigure locales tzdata keyboard-configuration console-setupInstall your Goodies!
Install the packages we’re grabbing from the live image to make sure our minimal install has all we need.
apt install $(cat /root/pkgs_auto.lst)
apt install $(cat /root/pkgs_manual.lst)
As with everything I install the following list as well.
System/Tools/Daemons. do NOT forget to enable ntpd.service or especially iwd.service or you will have to boot back into your live USB, redo the environment config steps and the mounting/chroot steps to do this. Ask me how I know.
- ntpd
- iwd
- NetworkManager
- firmware-linux
User Software
- xfce4
- xfce4-goodies
- libreoffice
- vim
- zsh
- sudo
- neofetch
ZFS Configuration
Install required packages
apt install linux-headers-amd64 linux-image-amd64 zfs-initramfs dosfstools
echo "REMAKE_INITRD=yes" > /etc/dkms/zfs.conf
Enable systemd ZFS services
systemctl enable zfs.target
systemctl enable zfs-import-cache
systemctl enable zfs-mount
systemctl enable zfs-import.target
Make ZFS root encryption key available
Now chrooted into our system, we will import our drive and link it’s location to where ZFSbootmenu will expect to find it.
zpool import zdrivebriefly exit our chroot
exitand copy the key into place and croot back in.
cp /etc/zfs/zroot.key /mnt/etc/zfs/zdrive
chroot /mnt /bin/bash
At import, our zpool named zdrive should have automatically mounted to /etc/zfs/zdrive where we can create a symlink.
ln -s /etc/zfs/zdrive/zroot.key /etc/zfs/zroot.keynow ZFS should cache the fact that this zpool and dataset are imported and it should remain accessible through reboots.
Configure initramfs-tools
echo "UMASK=0077" > /etc/initramfs-tools/conf.d/umask.confNote: Because the encryption key is stored in /etc/zfs directory, it will automatically be copied into the system initramfs. There ARE security concerns to this.
TODO: zroot.KEY SEC CONCERNS https://github.com/zbm-dev/zfsbootmenu/blob/master/docs/general/native-encryption.rst
Rebuild the initramfs
update-initramfs -c -k allInstall and configure ZFSBootMenu
Set ZFSBootMenu properties on datasets
zfs set org.zfsbootmenu:commandline="quiet loglevel=4" zroot/ROOTSetup key caching in ZFSBootMenu.
zfs set org.zfsbootmenu:keysource="zroot/ROOT/${ID}" zrootCreate a vfat filesystem
mkfs.vfat -F32 "$BOOT_DEVICE"Create an fstab entry and mount
cat << EOF >> /etc/fstab
$( blkid | grep "$BOOT_DEVICE" | cut -d ' ' -f 2 ) /boot/efi vfat defaults 0 0
EOF

mkdir -p /boot/efi
mount /boot/efi
Install ZFSBootMenu
Fetch a prebuilt ZFSBootMenu EFI executable, saving it to the EFI system partition:
apt install curlmkdir -p /boot/efi/EFI/ZBM
curl -o /boot/efi/EFI/ZBM/VMLINUZ.EFI -L https://get.zfsbootmenu.org/efi
cp /boot/efi/EFI/ZBM/VMLINUZ.EFI /boot/efi/EFI/ZBM/VMLINUZ-BACKUP.EFIConfigure EFI boot entries
apt install efibootmgrefibootmgr -c -d "$BOOT_DISK" -p "$BOOT_PART" \
-L "ZFSBootMenu (Backup)" \
-l '\EFI\ZBM\VMLINUZ-BACKUP.EFI'
efibootmgr -c -d "$BOOT_DISK" -p "$BOOT_PART" \
-L "ZFSBootMenu" \
-l '\EFI\ZBM\VMLINUZ.EFI'Prepare for first boot
Exit the chroot, unmount everything
exitthen from outside
umount -n -R /mntExport the zpool and reboot
zpool export zroot
reboot
Now leave that USB in, and Yaldabaoth and the Archons willing, provided you made the appropriate prerequisite blood sacrifices, you will have a working system.
But Wait! Aren’t we Dual Booting??
Yes! the funny thing about dual boot is, it’s a sleeper. Without this removable USB key the system just boots into windows.
But when it’s plugged in at boot we are met with the ZFSbootmenu and can enter our Debian install no questions asked.
I did not have to configure this manually. Creating an EFI boot partition on my USB and installing ZFSbootmenu and efibootmgr seemed to do this for me. If this is not the case then you would go to the BIOS and set a boot order preference. See documentation on your hardware on how to do this, but for me it’s mashing either F1 or del at boot time.
Why are we prompted for a decryption key?
Good question. This is a work in progress but here’s what I’m working with. I’ve configured the earlier doc to be set up such that the properties on the root partition look to the following for a key.
zroot  org.zfsbootmenu:keysource  zdrive                     local
zroot  keylocation                file:///etc/zfs/zroot.key  local
If I understood the documentation and the following correctly, ZFSbootmenu SHOULD be able to read a key from a partition on an external device and pull the key off.
- https://github.com/zbm-dev/zfsbootmenu/blob/master/docs/general/native-encryption.rst
- https://www.reddit.com/r/zfs/comments/lkd10u/still_confused_as_to_how_zfsbootmenu_handles/
- https://github.com/zbm-dev/zfsbootmenu/issues/215
I’m still ironing this one out. Some sources indicate that I will need to write an init script. This is possible. Will address shortly.
initramrd and Key Security
From https://docs.zfsbootmenu.org/en/v3.0.x/general/native-encryption.html
When adding encryption keys to initramfs images, always ensure that the resulting images are not readable by any user other than root. Recent versions of dracut and mkinitcpio ensure this by default with umask of 0077. Users with read access to your initramfs image will be able to read your ZFS key file even if it has mode 000 in the image; always confirm for your self that the initramfs is protected!
I confirmed this with
┌──(eli@VCR)-[~]
└─$ ls -lah /boot
total 103M
drwxr-xr-x  3 root root    7 Mar 27 19:29 .
drwxr-xr-x 18 root root   26 Mar 26 05:28 ..
-rw-r--r--  1 root root 254K Mar  5 22:21 config-6.1.0-32-amd64
drwxr-xr-x  3 root root 4.0K Dec 31  1969 efi
-rw-------  1 root root  95M Mar 26 13:54 initrd.img-6.1.0-32-amd64
-rw-r--r--  1 root root   83 Mar  5 22:21 System.map-6.1.0-32-amd64
-rw-r--r--  1 root root 7.9M Mar  5 22:21 vmlinuz-6.1.0-32-amd64
┌──(eli@VCR)-[~]
└─$ cp /boot/initrd.img-6.1.0-32-amd64 .
cp: cannot open '/boot/initrd.img-6.1.0-32-amd64' for reading: Permission denied
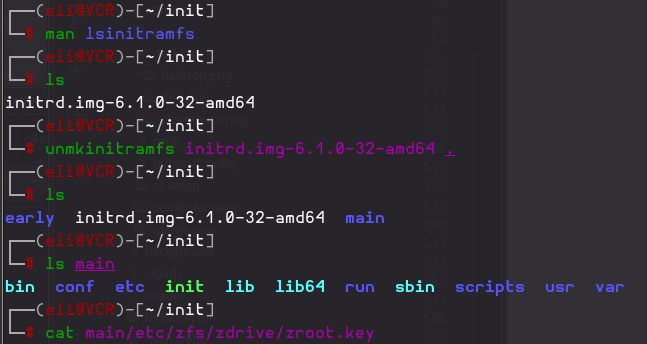
But I wanted to demonstrate what that would look like were the file able to be grabbed. I found a couple of writups about unpacking initram files
- https://www.baeldung.com/linux/initrd-vs-initramfs
- https://trendoceans.com/how-to-unpack-initrd-initramfs-to-view-content-in-linux/
but as usual what worked was a stack overflow article
For Ubuntu, at least newer versions, you could use the commands
lsinitramfs <file>to inspect andunmkinitramfs <file> <target directory>to extract.